Pages

Tuesday 26 February 2013

HTML PART 2


Presentational Tags

 WE are familiar with the ability to make text bold, italic, or underline; these are just three of the ten options available to indicate how text can appear.

So let’s begin with all this tags.

Bold text-The <b> tag

Any text that written in between <b>…<b/> tag was considered as bold.


Here we can see that in first line it is written with <p> tag that is I dreamed only of seeing prague
And in second line it is written with <b> tag that this is paragraph two……..<b/>
See what is going to happen


We can see that the text was written in bold.

Italic Text - The <i> tag
Any text that written in between <i>…<i/> tag was considered as italic.


In the following figure we have use the <i> tag


Underlined Text - The <u> tag
Any text that written in between <u>…<u/> tag was considered as underline.

In the following figure we have use the <u> tag after the <i> tag

Strike Text - The <strike> tag
Any text that written in between <strike>…<strike/> tag was considered as strike through.

In the following figure sentence has been written in between the<strike>

Monospaced font - The <tt> tag
The  <tt>tag is written in monospaced font. Most fonts are known as variable-width fonts because different letters are of different widths. In  monospaced font each letter is the same width.
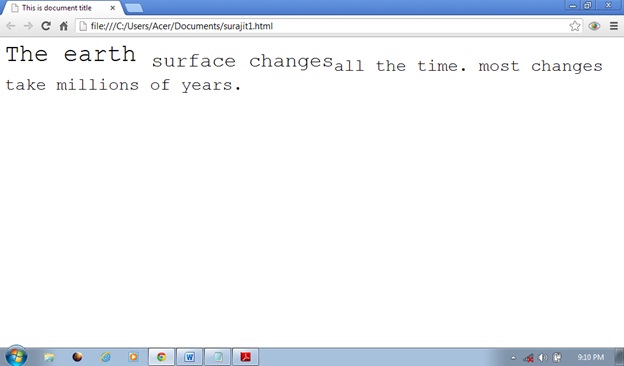


Superscript Text - The <sup> tag
The font size used is the same size as the characters surrounding it but is displayed half a characters height above the other characters.


Subscript Text - The <sub> tag
The font size used is the same as the characters surrounding it, but is displayed half a characters height beneath the other characters.


Larger Text - The <big> tag
The content of the <big> element is displayed one font size larger than the rest of the text surrounding it.


Smaller Text - The <small> tag
The content of the <small> element is displayed one font size smaller than the rest of the text surrounding it


Grouping –The<div> and <span> tag
It helps us to create the section or subsection of any page.
For creating the link first you have to open the run dialog box by pressing window key + r then the run dialog box will appear. After that click on browse button then other window will appear on the screen after that choose that file where you have save your document by xyz.html name after that the link will appear on the run dialog box like ”c:\user\Acer\Documents\xyz.html”   copy that link and past on the notepad with the help of ctrl+v and type <a href=”c:\user\Acer\Documents\xyz.html”>and then write that name which you want to give like home or etc.
For better understanding let us take the following example

Then the following thing is going to happen

Here we can see that there is three icons are coming on the screen so just click on any icon and see what is going to happen.
Let’s click on the home icon if your link is created correctly then you will find that by moving the mouse over that icon it changes into hand sign and then click on it

After clicking on the icon like in home we can able to see that the following page has open and if we want to go back to the first page that again the process has to repeat.
We have to write the following code again <a href="C:\Users\Acer\Documents\surajit.html">back</a>
Then the back link will going to create and we will find the back icon on the screen

And by clicking on that particular icon we can go to the main page
We can also create the links between the all pages by same methods. And it will become easier to navigate between two pages.

HTML phrase tags
  As we have discuss earlier also that about the bold, italic, and other tags but some elements give text emphasis and strong emphasis respectively and there are several elements for marking up quotes.
So we are going to discuss all about that tags only

Emphasized Text - The <em> tag
The content of an <em> element is intended to be a point of emphasis in your document, and it is usually displayed in italicized text.

In the following figure we can see that heading is written in between the <em> tags and let us see what is going to happen

Here we can see that heading has become italic
Strong Text - The <strong> tag
 The <strong> tag is intended to show strong emphasis for its content; stronger emphasis than the <em> tag. As with the <em> tag, the <strong>tag should be used only when you want to add strong emphasis to part of a document


Here we can see that heading is written in between <storng> lets us see what is going to happen

Text Abbreviation - The <abbr> tag
It is used to indicate abbreviated when we are using an abbreviated form by placing the abbreviation between <abbr> tags.

In the following figure we can see that pen drive is written in between <abbr> tag and after that pd is written which is the short form of pen drive so let’s see what is going to happen

Here we can see that when we move our mouse over the pd we can see that pen drive is highlighting over there.


                                                          to be continued.............................. 


Tuesday 5 February 2013

Declaring variable in C# Part 2


           In the previous post we have learn about basic terms of c#  a little about OOP (object oriented programming )  and writing and executing  a particular program in this post we will learn about variables and how we can apply it to our myname.cs program. If you didn't read it just click here.
So let’s begin the fun.

What is a Variable?

A variable is what we use to store some data or value to location in the memory, relax we just have to declare the name of the variable an assign a value to it, it is easy.
Syntax to declare any variable:

<Data type><variable name>;
<Variable name> = <value>;

Data Types and Their Types   

    Now you will learn about data types and we will explain you the preceding syntax more easily

In the above syntax what is?

1.    <Data type>

       <Data type> is the type of data we want use in our program example letter a number or mixer of both, C# provide some predefined data types that can be directly used in your program. Some of the predefined data types in C# are:

Data Type
Bytes
Values
Char
2
0 to 65535
Int
4
-2,147,483,648 to 2,147,483,647
String
Variable length
0-2 billion Unicode characters.
Float
4
(For negative Values)                      -3.402823E+38 to -1.401298E-45
(For positive Values) 1.401298E-45 to 3.402823E+38
Double
8
(For negative Values)                      -1 .79769313486232E308 to              -4.94065645841247E-324
(For positive Values)
4.94065645841247E-324 to
1 .79769313486232E308

Bool
1
True or false

        The bytes column shows that how many bytes are required to store a particular data type in the memory, And the value column show the range of the value.

How many types of data types there are?
          

         1. Reference
This type of variable contains the address of the value stored in the memory. More than one reference type variable can be created for the same memory location. All the referring variables will automatically reflect the changed value, if you modify the value in the referenced memory location. String is a reference data type in c#.
.            

           2. Value

      These types of variable directly contain data. Char, int, and float data types are value type. When you declare a char variable the system allocates memory to store the value, not the address of the memory location like reference type. 

        3. Dynamic data type

      A variable of this type can be used to store any type of value. And it can use the property of that data   type it is resolved to. Dynamic variables are declared by using the dynamic keyword.
Consider the following example:

 dynamic    A;

     In the preceding example, the variable A is declared a dynamic variable. So, it can store any type of value, example  
1.  A  =     2;( A is considered as int data type ) 
2.  A  =  “M12A”;                        ( A is considered as string data type )


Rules for declaring a variable
  1.  Must begin with a letter or an underscore (_) which may be followed by a sequence of digit (0-9), letters, or underscore. The first word of the variable name must not be a digit.
  2. Must not contain any symbol; however an underscore (_) can be use wherever a space is required.
  3. You can’t use any keyword as variable name.
  4.  Must be unique you can’t use the same name for declaring four different variables.

How to accept and store value in variables 

        Now if you want that your program will accept a value provided by user then you have to use the Console.ReadLine () method.

The syntax for the following code is:

Sting model_no;
model_no = Console.ReadLine ();

     In the preceding code, we declared a variable model_no of string data type, and instead of assigning its value we used the Console.ReadLine () method so it can accept value by the user.

     By default Console.ReadLine ()method accept data in string format if you want to use any other data type you have to use the convert () method, this method inform the compiler to convert one data type to another, it is known as explicit conversion 

To do this you have to use the following code:

model_no = Convert.ToInt32 (Console.ReadLine ());

Here, Convert.ToInt32 () method converts the data provided by user to int data type.

Always remember one thing that C# is case sensitive so if you write convert.toint32 () instead ofConvert.ToInt32()your program will not run.

Let’s write a program

 Now we will apply everything we learn here to our myname.cs program
  
  Now the code for our new program:

using System;

public class My_name
{
String name;
public void input_otput()
    {

Console.WriteLine("Type your name ");
    name = Console.ReadLine();
Console.WriteLine("your name is  " + name);

    }
public static void Main()
    {
My_name name = newMy_name();
        name.input_otput();

    }

}

The following output will be shown at your visual studio command prompt screen:


You have to type a name when you see “Type your name on the screen” and press enter then it will show whatever name you have typed.

In the preceding program code 

   We have used some new thing in the program code and some was already explained to you in my previous post   (click here to read)

     1.  Member variable

Member variables are data member of a class. In the given code, the My_name class has one member variable name. This variable is used to store data provided by the user.

      2. Member functions

      Member functions are also known as member method. The code for the My_name class contain one member function input_output(). And they are declared with return type void this they will not return any value.
           The input_output()method or function prompt the user to enter his/her name, it then store this details in the respective variable and then display it. You can create one more function and use it to only display details it is upon you.

3.    Instantiating class

   The MainClass contain the main () method. This class is used to instantiate the My_name class. To implement or use the functionality of a class you have to create an object of the class.

 Syntax for creating an object is:

<Class name><object name>=  new<class name> ();

Consider our My_name class. To create an object (name) of the My_name class you have to use the following statement in the Main() method 

My_name  name   =  new My_name ();

The new keyword is used to allocate memory to an object at run time. The object name and the “.” operators are used to access the member function of the My_name class. As shown in the following code snippet:

name.input_otput();

Now you can create some program like the above one and comment what you like and your problems in writing programs, I will answer your entire query.


Previous post                                                                                                             Next post